No products in the cart.
Are you ready to optimize your website?

Want to get the most out of your website? Optimizing your WordPress site for both search engines and visitors is crucial if you want to keep growing and eventually monetize your website.
WordPress SEO improves a website’s rankings on search engines and drives more organic traffic.
As one of the best content management systems, WordPress is designed with best practices in mind to make it SEO-friendly. However, you can further optimize it to ensure the best search engine rankings and website performance.
WordPress website optimization involves multiple steps, methods, and tools. These optimization strategies include setting up an SEO-friendly website with WordPress, optimizing its content, and taking actions outside the website to bring more positive results.
This WordPress SEO guide will go over the best practices and provide useful tips to implement them. If you are unsure about implementing these strategies on your own, we will also discuss how to hire an SEO professional.
What Is Search Engine Optimization and Why Is It Important?
Search engine optimization (SEO) is the practice of optimizing web pages to rank higher on search engine results pages (SERPs).
WordPress SEO efforts can drive more traffic and improve a website’s visibility and credibility, increasing conversion rates. In fact, the top three search query results get more than 50% of the total click-throughs.
Search engines employ crawler bots to find fresh and updated content. They then rank it on SERPs based on multiple factors.
How to Make Your WordPress Website SEO-Friendly
The first step is to configure the WordPress website’s settings. Correctly configuring the WordPress site is important to make it visible to search engines.
Pay attention to the following WordPress admin settings and other website setups:
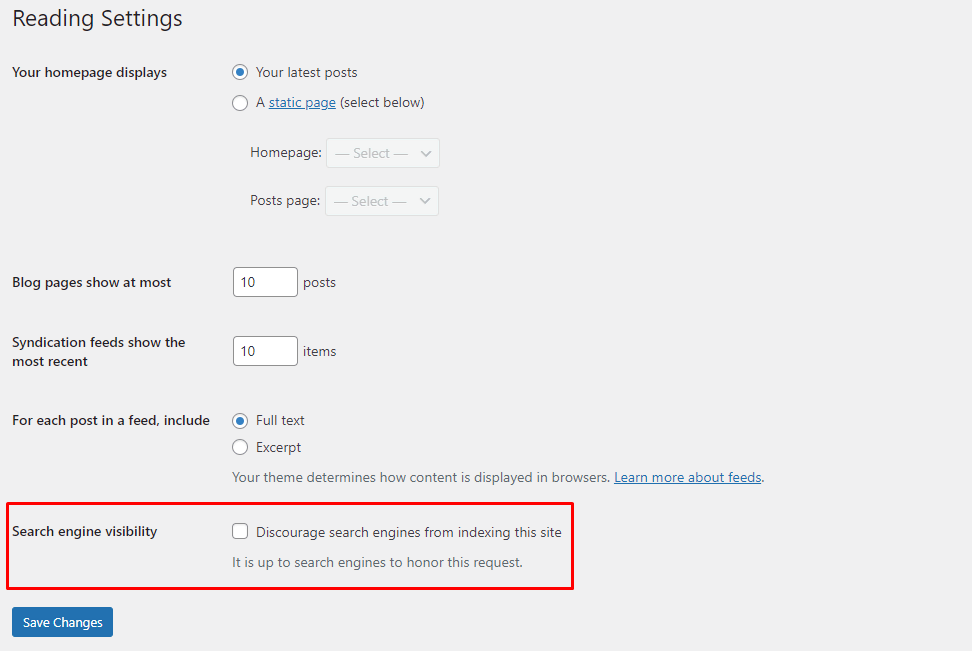
1. Check WordPress Site Visibility Settings
The first step is to check the WordPress site’s visibility settings.
WordPress has a feature to prevent search engines from indexing the website. This setting should be disabled by default, but it’s best to check if it is.
- Go to your WordPress Dashboard → Settings → Reading.
- Find the Search engine visibility checkbox and ensure it’s unchecked.
2. Add Your Website Sitemap to Search Engines
Although search engines index websites automatically, submitting a sitemap will help them include accurate and updated information on SERPs.
A WordPress sitemap is a list of all public URLs on a website. There are two types of WordPress sitemaps – XML and HTML.
The XML sitemap is the one you should submit to the search engines. It shows the pages’ importance and relationships with each other. This site structure information helps crawlers find specific content easier.
First, you must generate the XML sitemap with a WordPress SEO plugin. In this article, we’ll use AIOSEO.
- Once AIOSEO is installed and activated, head to All in One SEO → Sitemap from your WordPress dashboard.
- Open the General Sitemap tab and click on the Open Sitemap button. The browser will open the XML sitemap in a new tab. You can use the URL to submit the sitemap to search engines.
- Once you have the XML sitemap, submit it to the Google Search Console and Bing Webmaster Tools.
Note that there’s no need to submit the sitemap to other search engines like Yahoo! and DuckDuckGo since they use indexing data from Bing Webmaster Tools.
3. Install an SSL Certificate
Secure Sockets Layer (SSL) is a security technology that encrypts the connection between a website and a browser. SSL encryption prevents unauthorized parties from accessing sensitive information on a website.
An SSL-certified domain will help secure your WordPress website, improving its ranking on search engines.
When a domain is SSL-certified, its URL starts with https:// instead of http://. In addition, the browser displays a padlock icon next to the address.
Another SSL benefit is that search engines consider HTTPS when determining a website’s page experience.
Some web browsers label sites without SSL certificates as not secure, advising visitors against opening them. This makes having an SSL certificate essential to avoid driving away potential traffic and hurting your website’s conversion rate.
4. Decide Between www and non-www
The next step in making your WordPress website SEO-friendly is to decide if you’ll use the www site URL. Google considers www and non-www separate URLs, so choosing one domain format can help increase rankings.
- Head to your WordPress Dashboard → Settings → General.
- Enter the preferred version in the WordPress Address (URL) and Site Address (URL) fields.
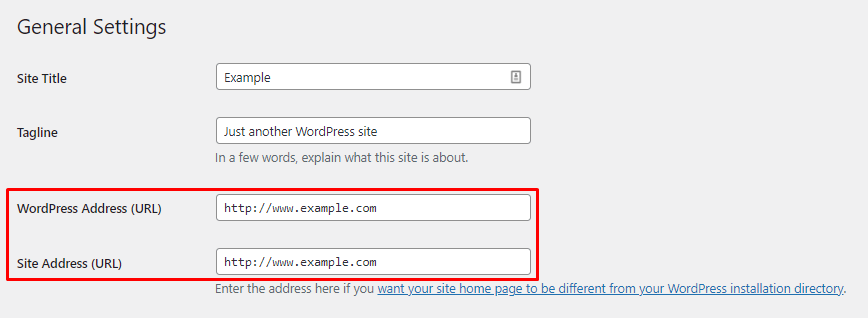
Alternatively, redirect your non-www URLs to www ones or the other way around.
Finally, remember to use the same URL format when sharing your site’s address.
5. Setup a Permalink Structure
Each web page has its own permanent URL structure called a permalink. A clean permalink structure helps users and search engines navigate your WordPress site, improving its search engine optimization.
Moreover, search engines often display URLs on search results. Visitors trust clean and readable permalinks more than ones with random letters and numbers.
WordPress uses the default ID number as the permalink for a page, such as https://example.com/?p=123. You can change the permalink structure to other pre-defined ones or set a custom one for your WordPress website.
Head to Dashboard → Settings → Permalinks to change the default permalink structure. Select the Custom Structure option and include the necessary tags.
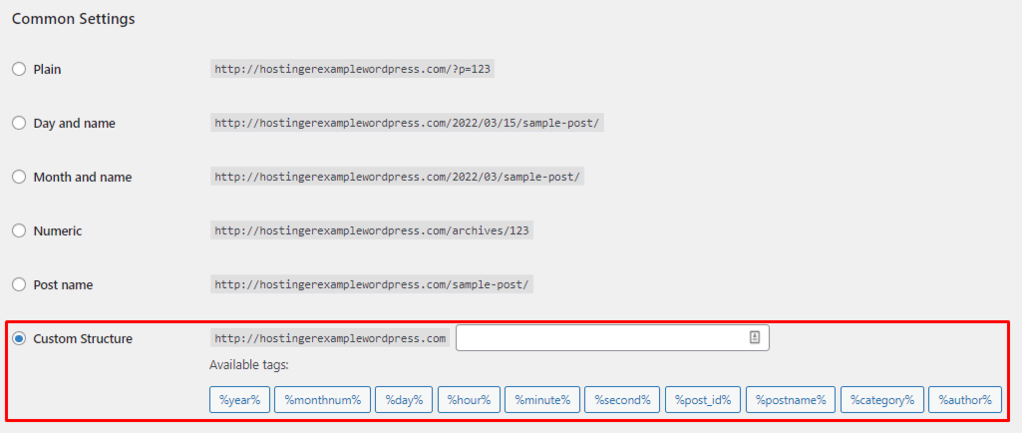
Choose the tags based on your website type. For example, news sites often include the date and title in the site’s URL. Meanwhile, online stores’ permalinks usually have the category and post name.
Remember to redirect your old URLs if your WordPress site is already online. Live WordPress sites risk losing existing referral links when changing the permalink structure.
6. Utilize Structured Data
Structured data is a standardized format for providing information and classifying the page content. It describes the content using schema markups, which convert your content into code.
Structured data makes it easier for search engines like Google to understand a page or post. In addition, it can change the way a content snippet looks on SERPs.
Search engines read this code and display rich results that appear above the regular results. Appearing in rich results can increase your click-through rates and boost exposure.
An example of rich results is the Recipes snippets. A recipe page with valid structured data can appear as an engaging search result that shows more information, such as the rating, required time, and ingredients.
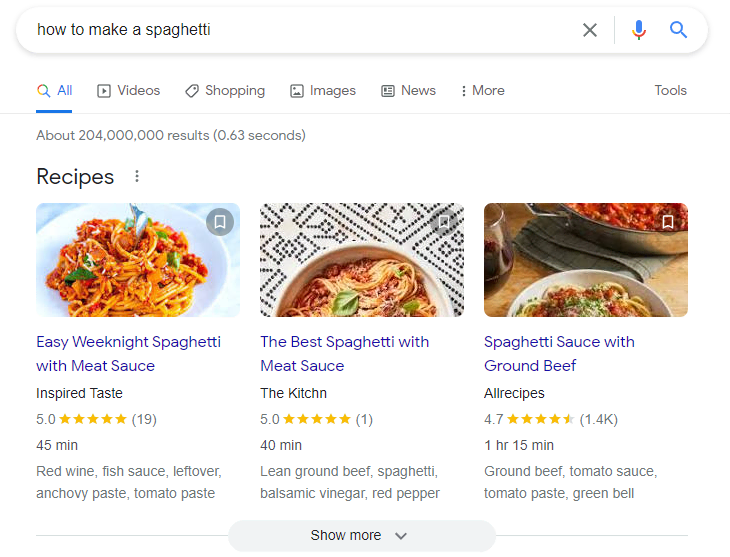
Other common rich result types include Books, Reviews, Movies, Top Stories, and Products.
Follow the structured data guidelines to increase the chances of your pages appearing as rich results on SERPs. However, note that Google does not always create a rich result section for a query, even with structured data.
There are two methods to add WordPress schema markups – using a WordPress SEO plugin or manually with JSON-LD. To avoid damaging your WordPress website, the manual method requires coding knowledge.
A WordPress SEO plugin is the easiest way to improve your pages’ appearance on SERPs. We will use AIOSEO to demonstrate how to add schema markups using a plugin.
There are two ways to add schema markup using the AIOSEO plugin – site-wide, and individual pages and posts schema markup.
Adding Site-Wide Schema Markup
The site-wide schema markup will be the default for all posts and pages.
- Go to All in One SEO → Search Appearance from your WordPress dashboard and open the Content Types tab.
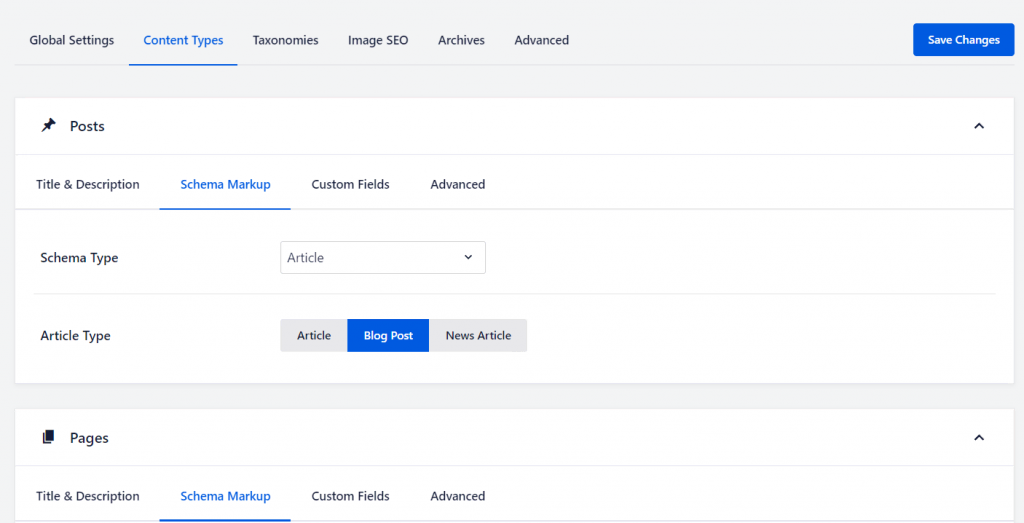
- You’ll find sections for posts and pages. Select Schema Markup and find the Schema Type option with a drop-down menu.
- Select your WordPress website’s default type of content. For example, you can select Article for Schema Type and then choose an Article Type option.
Adding Schema Markup for Individual Pages and Posts
The AIOSEO plugin also lets you add specific schema markup for individual pages and posts.
Open the page or post you want to edit.
Scroll down to the AIOSEO Settings and select the Schema tab.
Use the drop-down menu to select the Schema Type and fill in the Description text field.
Use Google’s Schema Markup Testing Tool to see what rich results search engines can generate for your page and validate your schema markups.
Note that creating a blank page to hold structured data will not increase the chances of appearing as rich results. In addition, avoid using schema markups for information that isn’t visible to users.
7. Create WordPress Tags and Categories
Categories and tags are essential WordPress taxonomies to help users navigate WordPress sites.
Since categories are hierarchical, posts are sorted into parent and subcategories. In comparison, WordPress tags are keywords that explain the post content.
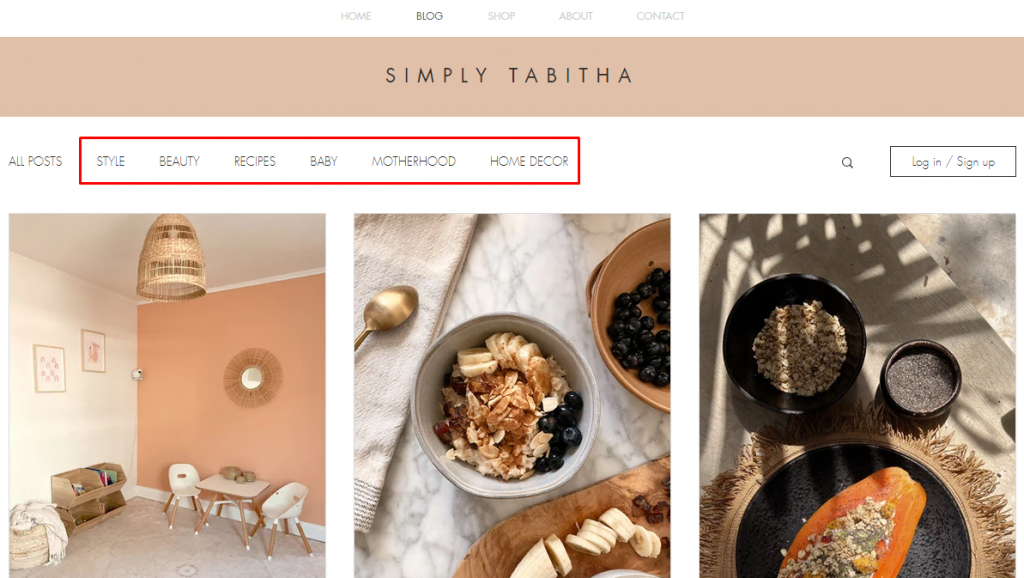
Any website that consistently features different content types should utilize WordPress categories. For example, Simply Tabitha’s blog section includes a category menu that makes it easier for visitors to navigate between pages.
To create and edit categories, open your WordPress dashboard and head to Posts → Categories. You will see the list of all existing categories on the right side of the screen.
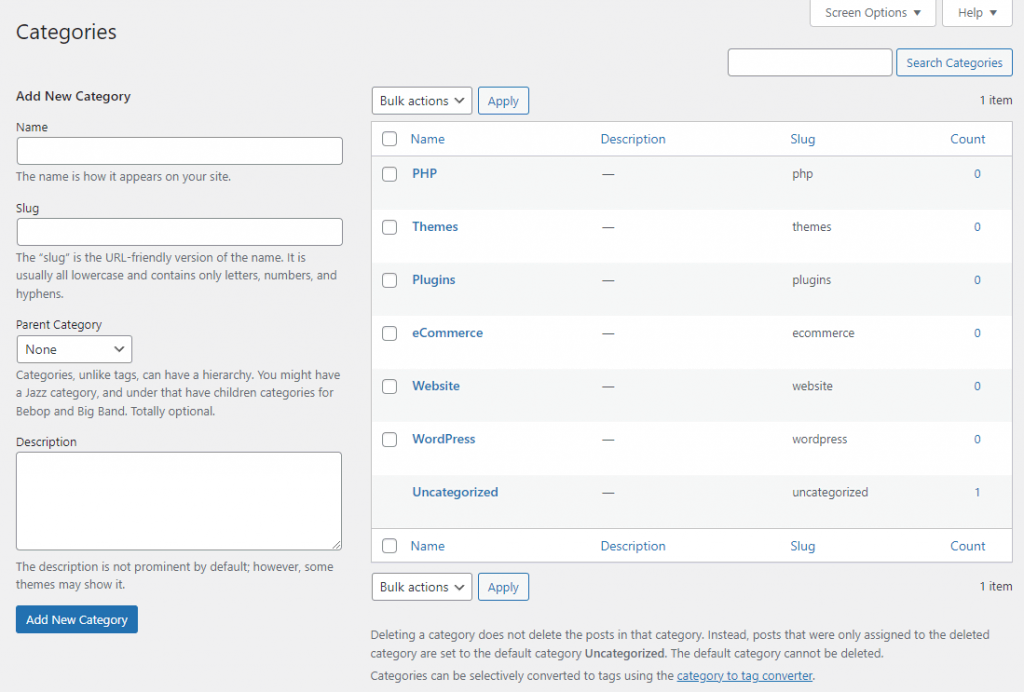
To add a new category, fill in the Name, Slug, and Description fields. If it’s a subcategory, assign a parent category for a more organized website structure. Save the changes by selecting Add New Category.
Customizing tags is similar. Head to Posts → Tags and click Add New Tag when finished.

Alternatively, use the WordPress editor to add new categories and tags. However, this method does not let you insert descriptions.
Finally, remember that each category and tag has its own slug and page. Therefore, make sure to optimize their URL and design.
8. Enable Breadcrumbs
Breadcrumbs are links that show visitors their location on a WordPress website. Enabling breadcrumbs improves a website’s user experience and navigation. It is especially useful for content-heavy websites with many pages and blog posts.
eBay features a great example of how breadcrumbs help visitors navigate a website. Users can click on previous categories within the breadcrumbs to find related items when looking for a product.
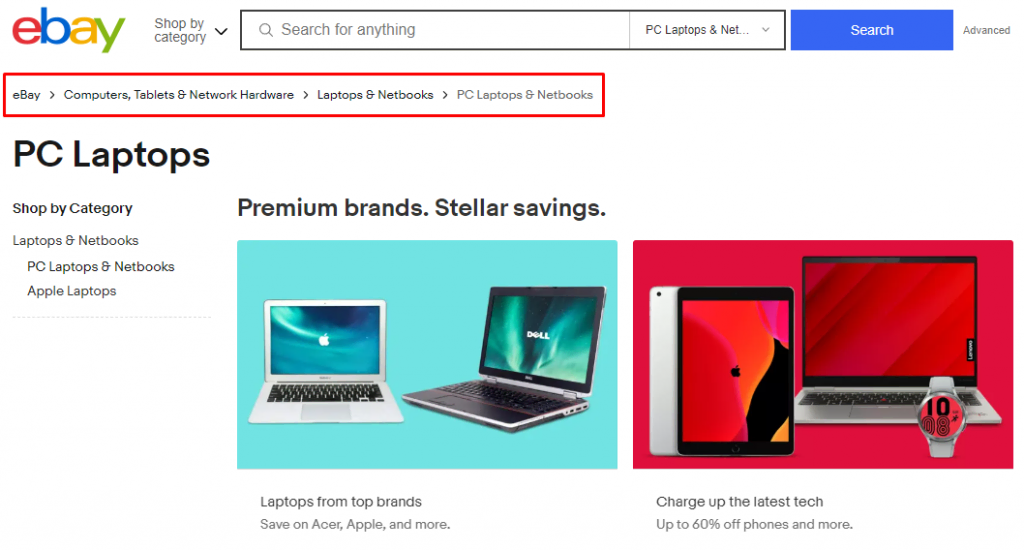
Breadcrumb trailing is an excellent internal link strategy. It helps search engines understand the relationship between pages. It also encourages visitors to explore more pages on a website, reducing bounce rates.
Google also displays breadcrumbs on SERPs instead of the page’s URL. This helps users know the page’s location or category on the website, allowing them to decide whether the page fulfills their search intent.
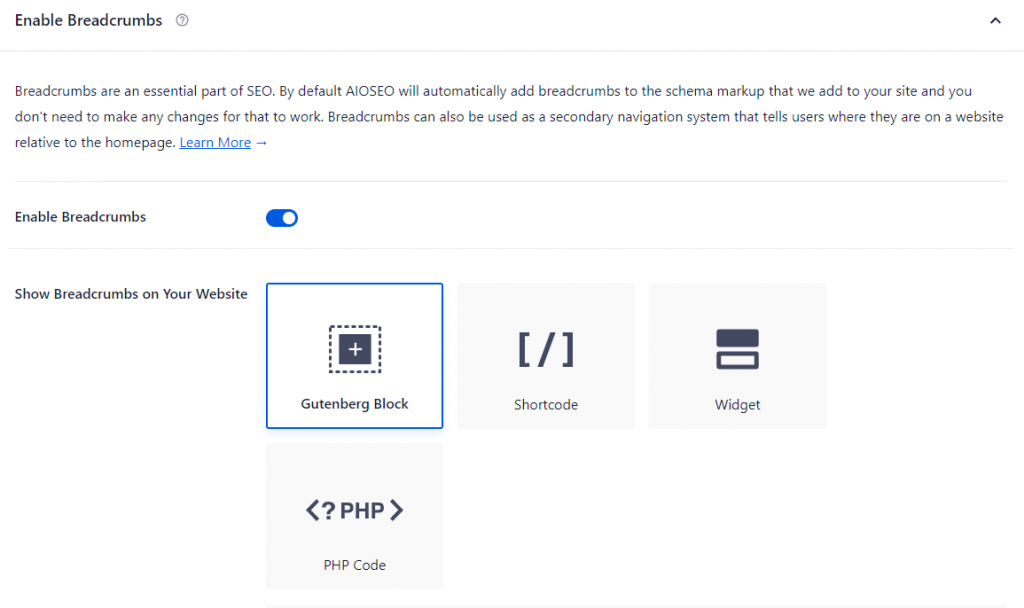
We recommend using the AIOSEO plugin to enable breadcrumbs on your WordPress website.
Navigate to All in One SEO → General Settings and open the Breadcrumbs tab. Switch the Enable Breadcrumbs toggle on and select how you want to embed breadcrumbs on the website.
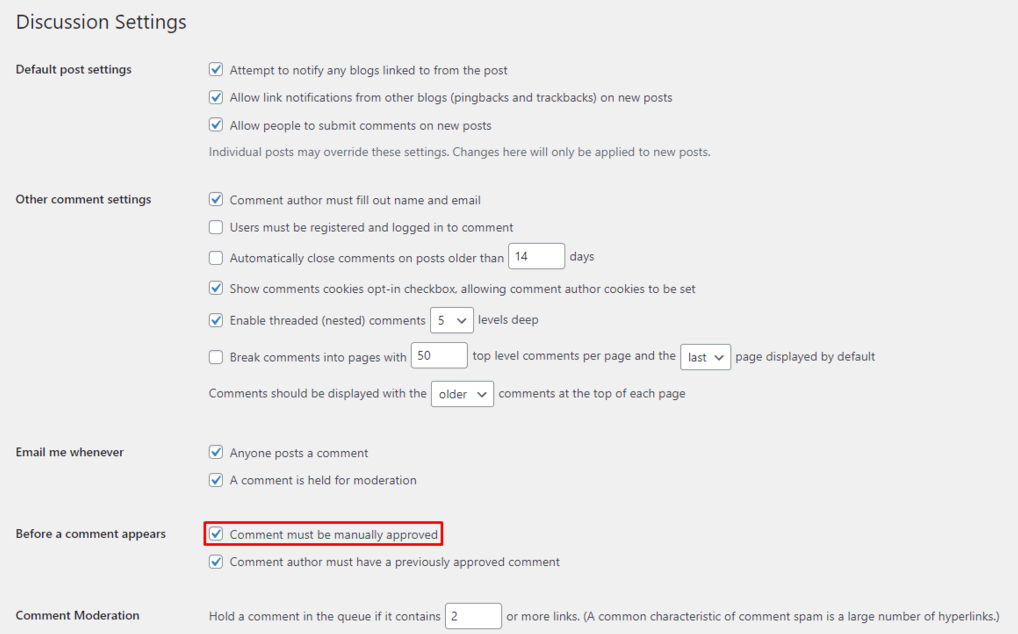
9. Enable Manual Approval for Comments
Spam comments often include links to malicious sites that can hurt your rankings. Enabling manual comment approval will help secure your WordPress website and protect its reputation.
Review each comment to avoid unwanted messages on your site. WordPress makes it easy to do so with its Discussion Settings.
Head to Dashboard → Settings → Discussions from the WordPress dashboard to enable manual comment approval. Check the Comment must be manually approved box and scroll down to Save Changes.
10. Enable “Last Updated” Date
Enabling the Last Updated date on WordPress posts can generate more clicks. Even though the publishing date of a blog post does not affect a website’s search engine rank, it is still visible on Google search results.
A post’s last updated date influences visitors’ decision to click on a page. This is because users tend to look for content with the most recent information.
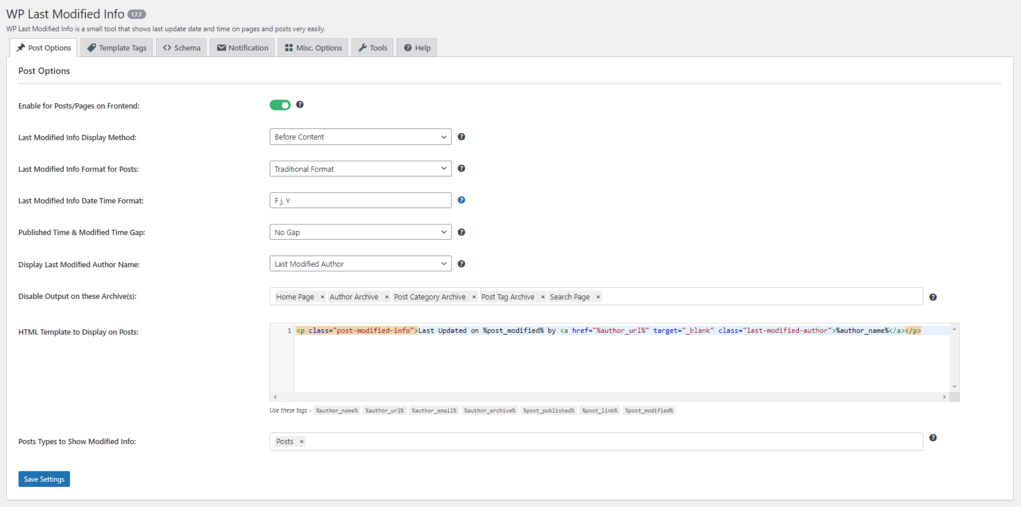
Some WordPress themes, such as GeneratePress, use filters to show the last updated date. If your theme does not have the feature, enable it using a WordPress plugin. We recommend WP Last Modified Info.
Once you’ve installed the plugin, activate the last updated date settings:
- Head to Settings → WP Last Modified Info → Post Options.
- Toggle the button next to Enable for Posts/Pages on Frontend to turn on the last updated date feature.
- Change the rest of the settings accordingly and click Save Settings.
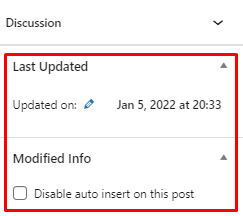
Next, head to your posts and pages and check if your WordPress site shows the last updated date.
To change the date on the block editor, click on the Settings icon and scroll down to Discussion. Adjust the date and settings on the Last Updated and Modified Info sections.